
Chapter 4: Salvage Operation
A derelict ship lists perilously close to capsizing. Its decks are scarred by the atrocities they have witnessed. Lost for three years in unknown waters, it has been spotted within a day’s travel of its homeport of Saltmarsh. And it is being hunted…
Originally published in 2005, this adventure was pulled from Dungeon 123 and written by Mike Mearl. It is designed for four to six characters of 4th level. The basic premise is, the characters are hired by a local down-on-his-luck merchant to salvage a box full of promissory notes and deeds from a ship that has been lost for several years. The party is offered 10% of the value of what is in the box to return it safely to its rightful owner.
At its root, this adventure is a dungeon crawl that ends with a skills challenge while the characters search for a MacGuffin. The adventure is very good and can be used as a side quest in a non-Saltmarsh campaign with relative ease. There is also so much potential for re-skinning the elements of the adventure. If Lolth doesn’t work in your campaign, then change the deity to Laogzed or Iuz (in the Saltmarsh campaign, Iuz could be used to make Captain Xendros more of a factor). The box that the characters are retrieving can have anything in it and can be used to push any story that you, as the DM, want to bring to the forefront. The potential is endless.
Just like in Danger at Dunwater, the adventure includes hooks and transportation to the location of the adventure. If you are running this as part of a campaign, you should bake in hooks to character backstories so that they are ready to go. The Sea Ghost should be the way that the characters travel to the adventure. Although, it might take a bit of finagling to set up the excuse for the rowboat to not be tied to the side of the Emperor of the Waves. In my campaign, I said that the two crewmembers pushed off from the damaged ship to keep them safe from whatever was on the ship. The rowboat was pushed away further at the end of the adventure due to the churning water of the octopus’ attack.
This was the adventure that I looked forward to the most. I had planted the seeds for this adventure at session zero by suggesting to a player that the former ship they had served on was the Emperor of the Waves. By tying a character’s backstory to the ship, there were no issues getting the players interested in pulling the salvage operation. The fact that they would earn 10% of 100,000 gold pieces did not hurt to give them plenty of incentive to take the job.
This is the first adventure in the book that does not include the sahuagin storyline. With its malleable content, this allows you to push the campaign’s story in whatever direction you want to go in. The sahuagin is a nice thread to pull through to Chapter 6: The Final Enemy, but there are still two more adventures that continue after that storyline has been finished. What makes Ghosts of Saltmarsh so much fun is how you push the story beyond what is on the page. It allows you to stretch your storytelling muscles and pull the characters into a narrative that furthers their backstories. Salvage Operation is the point in the campaign where you can make this campaign your party’s own story.
My anticipation of running this adventure was well placed. The actual encounters and puzzles that the player characters will face are good, but where this adventure shines is in the potential for storytelling. Take hold of the opportunities that Salvage Operation provides to craft the story that will take the overall campaign to the next level and create the story you want to tell.
Resources
I was heavily influenced by the advice that Sly Flourish provided. I watched his videos about how he prepared for each adventure and read his blog to get ideas.
How it Played
The dwarven ship, Soul of Winter, is in this adventure to provide transportation from Saltmarsh to the location of the Emperor of the Waves. For obvious reasons, I did not use Soul of Winter at all to transport the characters. Once at the Emperor, keep in mind that how the characters get from their ship to the Emperor is important in the adventure. I made sure to play up the debris and damaged nature of the Emperor so that the players decided to keep their ship safe by maintaining a good distance between the two ships. If you have to, have one of the crewmen suggest that it would be unwise to tether the two ships together. Two of the crewmembers rowed the characters over to the Emperor with the idea that they would stay with the rowboat to keep it safe.
The characters were nearly overwhelmed with the monsters on the main deck. This was not a problem with encounter design but was due to the party’s bad strategic placement in the rooms and cramped quarters. Some characters were trapped outside the rooms, while others were soon surrounded by giant spiders, ettercaps, and spider swarms. I pulled back on some of the other monsters in the lower deck to keep from killing all the characters. It would have been smarter for me to have killed a couple of characters in the long run, and then they might have been better about making good strategic choices. I have several new players to the game in this campaign, and I did not want to be too harsh in my punishments.
The leader, Krell, died without ever making an attack. The players beat him in initiative and overwhelmed him in the action economy. The players assumed that this combat encounter was the boss battle of the adventure and they went all out. They did not realize that the Emperor still had some more hidden surprises for them.
The escape plays like a skills challenge. Make sure you keep track of the rounds so that you know what is happening throughout this section of the adventure. I use a whiteboard to show initiative while playing and also kept track of the rounds on this board for all to see. Have the map of the entire ship laid out in front of your players and have them move through the ship as if it were combat. Amazingly, the characters took very little damage as they were escaping, which was a testament to their roles and not an issue with the mechanics.
The Emperor of the Waves

Team Daddy Issues on the deck of the Emperor.
I made a map of the Emperor of the Waves using foam core, scaled printouts, and clear cabinet liner. I also used Post-It notes to cover the rooms and hallways in the ship so that my players could not see the rooms until they opened the doors. I strongly suggest doing something similar, it added to the adventure to have something more than just lines drawn on a battlemap. Plus, the end of the adventure requires the full map of the ship to run the escape. The cramped location affected how combat encounters played out and how the characters explored the ship.
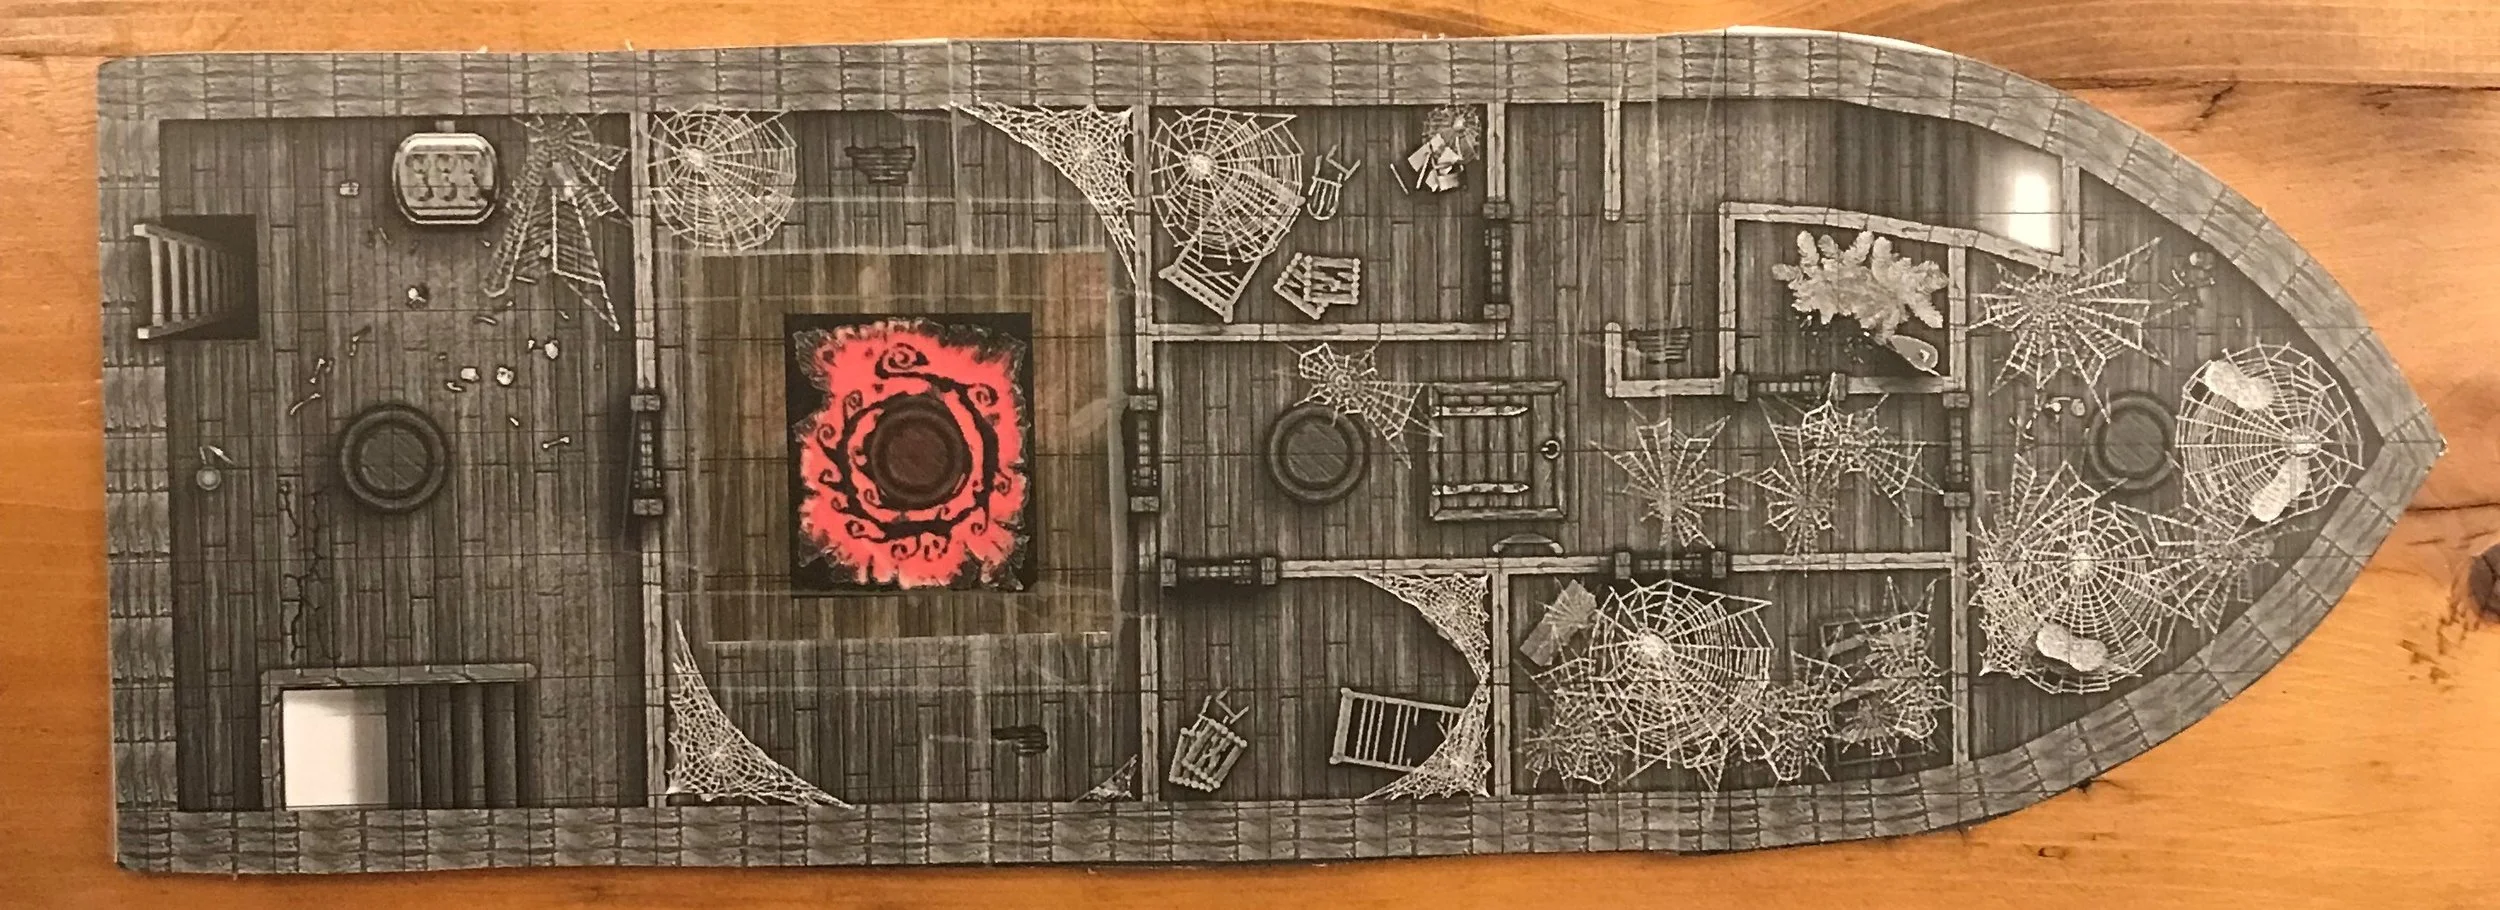
Middle deck of the Emperor of the Waves with the Chained God symbol in red. I found the battlemap here.

Team Daddy Issues
Mac - Gnome Bard; Hired by Eda to find out what happened to the tabaxi that washed-up-dead on shore in slave garb; Found evidence of Gellan being a part of the slavers.
Whisper – Genasai Druid; Witnessed the destruction of half of the Saltmarsh fishing fleet by Hood’s Gloom; Figured out that a quarterstaff is a good weapon; Rocked the Sea Ghost as a monkey. Dealt the killing blow to 1,000 Teeth.
Tidal – Genasai Sorcerer; Former crewmember of the Jolly Victory (owned by Gellan Primewater). Knows of the Endless Nadir and the Scum Pirates; Died fighting 1,000 Teeth.
Amar – Human Paladin; Former smuggle (Spirit of the Whale) – is trying to protect Wind. Found more evidence of Gellan’s slave trading (planted by Ned). Wears the Mariners Armor. Threw the first mate of the Sea Ghost, Bloody Bjorn, overboard.
Wind – Tabaxi Rogue; Disguised as a human and the Scarlett Brotherhood is looking for it because it stole a book from them. Killed the Bosun of the Sea Ghost; Assassinated Druid in the Hool Marsh.
What I Changed
In the book, they suggest replacing Aubreck with Anders, but I liked the tragic story of the once-powerful merchant having fallen on hard times. Aubreck’s misfortune had forced him to sell his mansion to the dwarves and they had made it into their mining headquarters in town. I thought this might become more of an adventure thread later on, but it did not. Also, Aubreck used to employ the paladin in the party, Amar.
A behind-the-scenes change that I made was by making Vertheg, Aubreck’s butler, the leader of the Scarlet Brotherhood in Saltmarsh. I had mentioned earlier in my overall review of the book that I had made a mistake by not connecting the players more closely with Anders. I sort of rectified this by having Vertheg replace Skerrin. I had Vertheg steal the promissory notes and deeds from the Emperor before it left port three years ago. The half-orc had been funding the Brotherhood with the money ever since. The box also contained evidence of Eda Oweland sacrificing a fishing vessel (the Verdict Fox) and crew to the Sea Princes.
During the voyage to the Emperor of the Waves, I used one of the magical weather events, a wildmagic fog (GoS p. 204). A sahuagin patrol attacked Monkey’s Carnage during the night. The crew helped the player characters fight off the menace, which was a very hard fight to track as the DM. I would suggest finding or developing a mass combat system to handle large groups of enemy and ally forces. Each of the player character spellcasters entered the combat at different times and all tried using magic as their initial action. This was fun and added to both this specific combat and the world as a whole. The players were now aware that magic could even affect and infuse the weather. The wild magic effects were benign, as chance would have it, the only real consequence was that Mac became five years younger. This would’ve been more entertaining on one of the other characters since they were all in their early twenties.
After that fight, I decided that the crew would no longer be part of combat. It might be a bit of metagaming, but I let my players know that the crew on Monkey’s Carnage were there to sail the ship and not to be used as cannon-fodder. They agreed to this, plus there are the obvious consequences of not being able to find replacements for all the previous “lost” crewmembers.
I handed Amar’s player a copy of all of the crewmembers that he knew on the ship. It was a grim tally as most of the crewmen’s fate was learned. Including Amar’s best friend, Shrug. Sadly, he had been turned into a vargouille and he could no longer shrug.
Taking Sly Flourish’s advice, I pulled in the Chained God by reskinning Krell from a Druid of Lolth to a Warlock of the Chained God. Krell positioned his phase spider, Roil, on the upper deck and it hid in the shadows. He watched the party and used his Awakened Mind to send them threatening messages (scraps of paper that I handed out as they made their way across the ship). If someone placed the killing blow on a swarm they would hear, “There are more so many more.” If someone killed a ghast they would hear, “Soon you will take its place and guard this holy place.” Amar, the former crewman on the Emperor, heard at one point, “I know you; I remember you. You are different.” These messages increased the players’ dread and added to the atmosphere of the adventure.
I was hoping that the characters would capture Krell and free him from his connection to the Chained God, but the dice giveth and the dice taketh away. He died without doing more than placing a few cryptic messages in the characters’ heads. As a boss battle, Krell was a disappointment, but the real boss battle was escaping the Emperor of the Waves.
This was the first time that the whole party saw the symbol of the Chained God and they also found a deciphered piece of the book that Wind had been carrying the whole campaign. This did not have a huge impact, because Wind liked to keep his past secret from the rest of the party. It did reveal to the party that the Chained God was going to play a big part in the campaign.
Again, I stole Sly Flourish’s idea with the vargouilles (Volo’s Guide to Monsters, p. 195) in the hold instead of zombies. The party’s rogue/warlock was given a kiss, which set up later events.
I changed the octopus to Hood’s Gloom, a sperm whale and kraken hybrid. Hood’s Gloom also makes an appearance in Chapter 7: The Styes, replacing the juvenile kraken in that adventure. Vertheg sent Hood’s Gloom to destroy the ship to hide the evidence, but it was not successful until too late.
Ned and Ered were the two crew members that rowed the player characters over to the Emperor of the Waves. I increased the tension by having Ered get killed in the thrashing tentacles of Hood’s Gloom. Ned was trying to row the boat but was having trouble doing it by himself. Whisper dove into the water and swam over to help. This was the first time the characters lost one of their crew members.
Amar

As a child, you used to have dreams of a man that would ask you to join him. Your brother had the same dream and you both used to believe you were dreaming of your father. But as time went on, the dreams stopped and you learned more about your father and you knew the man from your dreams was not the same person. Soon after you became a successful smuggler, your mother moved from the crab-infested Crabber’s Cove (Location 24) to a modest house. She works for the Strymon’s, who own the farm.
You served aboard the Emperor of the Waves, which was owned by Aubreck Drallion. You spent several years on the Emperor until the miracle. After the miracle, you went to the Procan temple and studied under Wellgar Brinehand. You have been living at the temple ever since.
Aubreck Drallion spoke poorly of you for leaving his employ. He took every opportunity to put you down in public. That was until the Emperor of the Waves disappeared on its next voyage. Aubreck never said a word against you again. You did hear that he was trying to stop smuggling and go legit with his operations. After the Emperor disappeared, Aubreck’s fortune and good luck disappeared. Two years ago, he had been forced to sell his mansion to the Dwarven mining operations and bought a more modest house (location 30).
Contacts:
Wellgar Brinehand (priest of Procan, Location 26) – lost his left leg
Ylana Reef (mother, location 32)
You know that Wind is a Tabaxi (everyone else thinks it is just another human)
Guildmaster Tabeth (Location 21) – Head of the Mariner’s Guild; Devout follower of Procan
Krag – Half-orc caretaker of the Saltmarsh Cemetery (Location 27)
Old Smuggling Contacts (Relations with these contacts are a bit rocky, they like you but don’t quite trust you):
Kreb Shenker – innkeeper at the Empty Net
Aubreck Drallion – Former employer (Location 30); He avoids you at all costs
Vertheg is his half-orc butler
Eliander Fireborn – Captain of the Guard; Town Council member. He still sees you as a smuggler and is waiting for the infamous ‘spirit of the whale’ smuggler to go back to his old ways.
Will Stoutly – Captain of the marines. He is neutral towards you since he is a regular attendee at the temple, but would not be surprised to see you revert to being a smuggler again.
Most of your friends that you made while smuggling was lost on the Emperor of the Waves
Aftermath
Wind was kissed by one of the vargouilles. The characters had no resources to remove the curse. I decided to introduce Firewatch Island early to give the characters a chance to save him. We also had a new player joining and I needed a way to introduce him as well. The new character was Urgag, a half-orc barbarian marine, who had been tossed overboard by his former crew for being too blood-thirsty. His presence on Firewatch is really funny to me given the peaceful nature of the island’s inhabitants. I introduced Morley (Ghosts of Saltmarsh, p.142) as a possible hook and a connection for later that never really materialized. After Janore Stormswake (GoS p.155) saved Wind and a boring night at the hermitage, the characters set sail for Saltmarsh with their new party member.
I also introduced the preyton that would later show up in Tammeraut’s Fate. Urgag was nearly ripped in half in the combat as it flew by Monkey’s Carnage. The characters nearly killed the preyton, but it was able to escape.
Once back in Saltmarsh, the characters confronted Eda about her sacrificing the Verdict Fox and her crew to the Sea Princes. Eda showed true remorse and said she had done it to save the rest of the people of Saltmarsh from the predations of the Sea Princes. The characters believed her and gave her the evidence to do with as she pleased.
Vertheg was visually surprised when the characters arrived at Aubreck’s house with the box. While Aubreck and the characters interacted, Vertheg ran away to the Brotherhood’s hideout in Crabber’s Cove. The party tracked the butler down and finally investigated the Crabber’s Cove. The fight that ensued included a warlock of the Chained God. Wind was caught in the most-inept fight I have ever seen. Both warlocks could not hit the broad side of a barn. Finally, the Chained God’s warlock hit Wind with an eldritch blast buffed with the invocation of repelling blast. The hit pushed Wind through a wall, and then the warlock retreated. Wind was so angered by this that he threw a spell at her as she retreated and killed her. When the characters removed the warlock’s mask, they revealed Amar’s mother.
The reveal and the way that Wind had killed her caused quite a bit of tension in the group. Her funeral and Eda laying a wreath on the memorial for the missing Verdict Fox ended the session. Next session Team Daddy Issues would have to decide what to do with Xolec and they are offered a job to clear a nearby island.

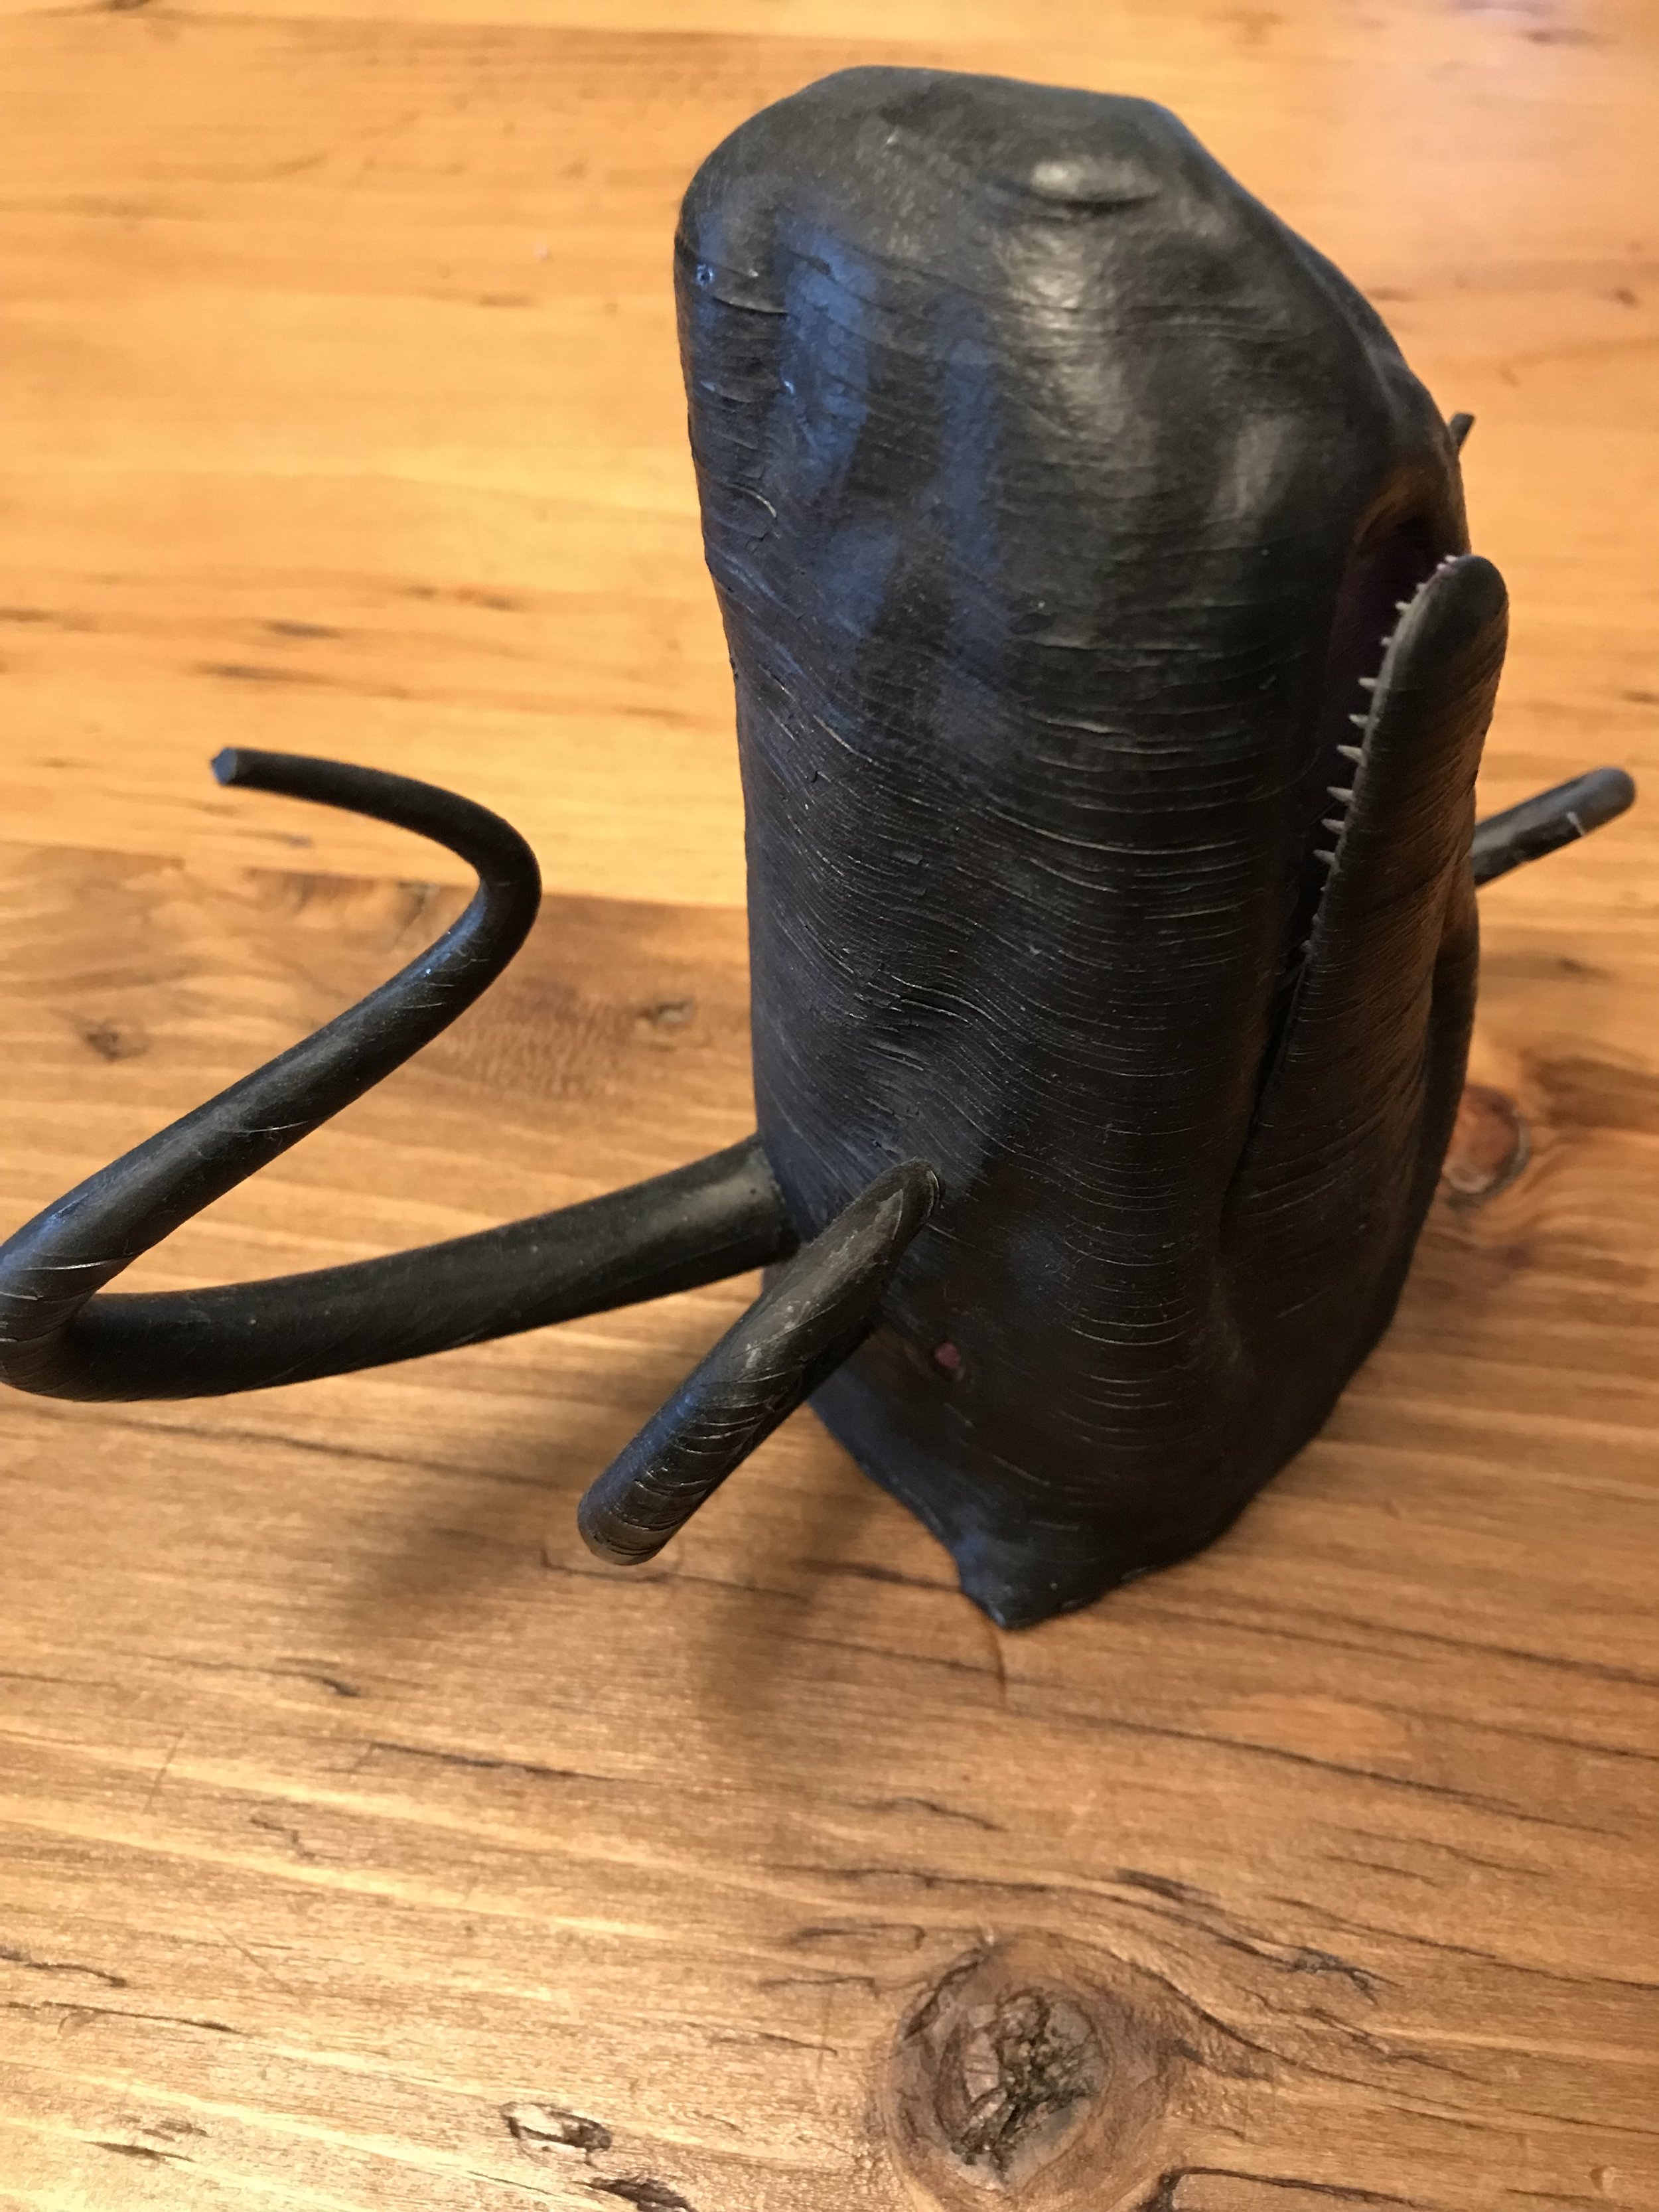
Hood’s Gloom
To create a more cohesive story, I combined the octopus in Salvage Operation and the juvenile kraken from The Styes into one creature. Hood’s Gloom is a proxy of the Chained God. It is an amalgam of an octopus and a sperm whale. I had to have a special mini made for this creature. Again, I worked with my friend Keith at Dragon Lair’s Miniatures to create this monstrosity. It was so fun to place this miniature on the table next to the Emperor of the Waves and get the players’ reactions. It does not take too much to add a little spark to make an encounter special.
